


Showing posts with label web. Show all posts
Showing posts with label web. Show all posts
Sunday, January 1, 2017

Thursday, September 8, 2016
GlobalMedicine Wordpress
Customized Solutions for Global Medical Information
 Clients tell us that we provide a flexible, responsive, and personable experience for them. And at ProPharma Group, those clients come from all over the world.
With strategically positioned contact centers around the world, we can provide a truly global solution to the medical information (MI) needs of pharmaceutical, biotechnology, and medical device companies.
By outsourcing pharmaceutical contact center services to ProPharma Group, our clients are able to alleviate challenges associated with developing and maintaining an internal department. Our five globally integrated, international contact centers are staffed with pharmacists, nurses, and life science graduates, many with advanced degrees. The inquiries they handle come from health care professionals, patients, and consumers all over the world.
With ProPharma Group as a partner, you can provide your customers with:
- Industry experienced medical information specialists to manage each case accurately and professionally
- Multi-lingual support in approximately 30 native languages
- A globally integrated, validated database
- Support for a single product or therapy area, a product cluster, or your full product portfolio
- Medical information responses consistent with product labeling and regulatory guidance
- Experience in a diverse range of therapeutic categories
- Adverse event processing and product complaint services
Our Professional Contact Centers are located in:
- Overland Park, Kansas
- St. Louis, Missouri
- St. Paul, Minnesota
- Richmond, United Kingdom
- Melbourne, Australia
Tuesday, September 6, 2016
html5 book part 1 tricks
Arnautweb
Nearly every section of the book contains practical code examples that demonstrate real-world use (A and B). Typically, they are coupled with screen shots that show the results of the code when you view the Web page in a browser C. Most of the screen shots are of the latest version of Firefox that was available at the time. However, this doesn’t imply a recommendation of Firefox over any other browser. The code samples will look very similar in any of the latest versions of Chrome, Internet Explorer, Opera, or Safari. As you will learn in Chapter 20, you should test your pages in a wide range of browsers before putting them on the Web, because there’s no telling what browsers your visitors will use. The code and screen shots are accompanied by descriptions of the HTML elements or CSS properties in question, both to give the samples context and to increase your understanding of them. In many cases, you may find that the descriptions and code samples are enough for you to start using the HTML and CSS features. But if you need explicit guidance on how to use them, step-by-step instructions are always provided. Finally, most sections contain tips that relay additional usage information, best practices, references to related parts of the book, links to relevant resources, and more.

You’ll find a snippet of HTML code on many pages, with the pertinent sections highlighted. An ellipsis (...) represents additional code or content that was omitted for brevity. Often, the omitted portion is shown in a different code
<body>
<header role="banner">
<nav role="navigation">
<ul class="nav">
<li><a href="/" class="current">home</a></li>
<li><a href="/about/">about</a></li>
<li><a href="/resources/">resources</a></li>
<li><a href="/archives/">archives</a></li>
</ul> </nav> ... </header>
</body>
</html>
Conventions used in this book The book uses the following conventions: n The word HTML is all encompassing, representing the language in general. HTML5 is used when referring to that specific version of HTML, such as when discussing a feature that is new in HTML5 and doesn’t exist in previous versions of HTML. The same approach applies to usage of the terms CSS (general) and CSS3 (specific to CSS3). n Text or code that is a placeholder for a value you would create yourself is italicized. Most placeholders appear in the step-by-step instructions. For example, “Or type #rrggbb, where rrggbb is the color’s hexadecimal representation.” n Code that you should actually type or that represents HTML or CSS code appears in this font. n An arrow (➝ ) in a code figure indicates a continuation of the previous line—the line has been wrapped to fit in the book’s column B. The arrow is not part of the code itself, so it’s not something you would type. Instead, type the line continuously, as if it had not wrapped to another line. n The first occurrence of a word is italicized when it is defined. n IE is often used as a popular abbreviation of Internet Explorer. For instance, IE9 is synonymous with Internet Explorer 9. n Whenever a plus sign (+) follows a browser version number, it means the version listed plus subsequent versions. For instance, Firefox 8+ refers to Firefox 8.0 and all versions after it.
Nearly every section of the book contains practical code examples that demonstrate real-world use (A and B). Typically, they are coupled with screen shots that show the results of the code when you view the Web page in a browser C. Most of the screen shots are of the latest version of Firefox that was available at the time. However, this doesn’t imply a recommendation of Firefox over any other browser. The code samples will look very similar in any of the latest versions of Chrome, Internet Explorer, Opera, or Safari. As you will learn in Chapter 20, you should test your pages in a wide range of browsers before putting them on the Web, because there’s no telling what browsers your visitors will use. The code and screen shots are accompanied by descriptions of the HTML elements or CSS properties in question, both to give the samples context and to increase your understanding of them. In many cases, you may find that the descriptions and code samples are enough for you to start using the HTML and CSS features. But if you need explicit guidance on how to use them, step-by-step instructions are always provided. Finally, most sections contain tips that relay additional usage information, best practices, references to related parts of the book, links to relevant resources, and more.
You’ll find a snippet of HTML code on many pages, with the pertinent sections highlighted. An ellipsis (...) represents additional code or content that was omitted for brevity. Often, the omitted portion is shown in a different code
<body>
<header role="banner">
<nav role="navigation">
<ul class="nav">
<li><a href="/" class="current">home</a></li>
<li><a href="/about/">about</a></li>
<li><a href="/resources/">resources</a></li>
<li><a href="/archives/">archives</a></li>
</ul> </nav> ... </header>
</body>
</html>
The book’s site, at www.bruceontheloose .com/htmlcss/, contains the table of contents, every complete code example featured in the book (plus some additional ones that wouldn’t fit), links to resources cited in the book (as well as additional ones), information about references used during writing, a list of errata, and more. The site also includes reference sections (Appendixes A and B) that we didn’t have room to include in the book. These are handy for quickly looking up HTML elements and attributes or CSS properties and values. (They also contain some information not covered in the book.) You can find the code examples at www .bruceontheloose.com/htmlcss/examples/. You can browse them from there or download them to your computer—all the HTML and CSS files are yours for the taking. In some cases, I’ve included additional comments in the code to explain more about what it does or how to use it. A handful of the code samples in the book are truncated for space considerations, but the complete versions are on the book’s Web site. Please feel free to use the code as you please, modifying it as needed for your own projects. The URLs for some of the key pages on the book’s site follow: n Home page: www.bruceontheloose .com/htmlcss/ n Code samples: www.bruceontheloose .com/htmlcss/examples/ n Appendix A: HTML Reference: www.bruceontheloose.com/ref/html/ n Appendix B: CSS Properties and Values: www.bruceontheloose.com/ref/css/ I hope you find the site helpful.
Video Training Visual QuickStart Guides are now even more visual: Building on the success of the top-selling Visual QuickStart Guide books, Peachpit now offers Video QuickStarts. As a companion to this book, Peachpit offers more than an hour of short, task-based videos that will help you master HTML5’s top features and techniques; instead of just reading about how to use HTML5, you can watch it in action. It’s a great way to learn all the basics and some of the newer or more complex features of HTML5. Log on to the Peachpit site at www.peachpit.com/ register to register your book, and you’ll find a free streaming sample; purchasing the rest of the material is quick and easy.
Unless a site is heavy on videos or photo galleries, most content on Web pages is text. This chapter explains which HTML semantics are appropriate for different types of text, especially (but not solely) for text within a sentence or phrase. For example, the em element is specifically designed for indicating emphasized text, and the cite element’s purpose is to cite works of art, movies, books, and more. Browsers typically style many text elements differently than normal text. For instance, both the em and cite elements are italicized. Another element, code, which is specifically designed for formatting lines of code from a script or program, displays in a monospace font by default. How content will look is irrelevant when deciding how to mark it up. So, you shouldn’t use em or cite just because you want to italicize text. That’s the job of CSS. Instead, focus on choosing HTML elements that describe the content. If by default a browser styles it as you would yourself with CSS, that’s just a bonus. If not, just override the default formatting with your own CSS.
Thursday, September 1, 2016
IS OR NOT IS THE CHAMPCASHE THE FAKE SITE
MLM / CHAIN MONEY
Is Champcash app new form of chain-money scheme?
The Champcash app on Google Play store, wants you to install 10 other apps and refer it to others to earn unlimited money, similar to money circulations scams
Champcash, a mobile app from Champion Networks Pvt Ltd, is found luring several Android mobile users, under the pretext of providing opportunity to earn unlimited money, free. However, after checking its business model, Champcash appears more like a chain-money, operating without permission from the regulators.
"Champcash is an Android Application Through which Anyone Can be a Millionaire By Just Installing Some Apps in Mobile. Just Refer Champcash to Your Friends and Ask them to Complete the Challenge By installing 8-10 Apps in their Android phone, You will Get its payment instantly," the company says on its website.
The app is listed under entertainment on Google Play and its title is "Champcash Earn Money Free". Here is says, "Funda is Simple, We are Giving Money of Advertisement. Users Installs the Apps and Advertisers Pay us and We Pay Users. You can Earn Unlimited without investing any money..."

This may sound good for a gullible person in need of free money, but remember, it is not as easy as it sounds. There are two serious issues with this claim from Champcash. One, there is no clarity on which 10 apps that a user is bound to install, open and use for at least a minute and second, why would an advertiser pay money to anyone for installing a third party apps? Also, if Champcash app is free, then why the user needs to punch in a sponsor ID?
It may sound to be a funny coincidence, but the usage of language and grammar on Champcash app on Google Play store and its own website, is more like the spam emails from fraudsters offering lottery money. (Read: RBI offering unclaimed funds through lottery? Beware, scamsters are on the prowl again )
Another issue is, how does the company claim to distribute money? Champcash says, "Other Companies are Giving money directly to their Users if they install Apps in their Phone. We Have Changed this Scenario, we are not giving any Money to the User who is Installing Apps in his phone But we are Distributing that money in Whole Network."

Now, I have been using, testing several mobile apps since past several years, and have yet to come across anyone who offers money to install an app. It is the other way around. If you use free apps, then there may be some advertising popping up while you use it. And if it is a paid version, then there would not be any advertisement besides providing your some more features of the app.
Since Champcash claims to receive and distribute money to everyone who uses its app, we asked a few questions around. First, we asked regulators, if Champcash is registered with them, since it is in money circulation business. In an email reply, an official from the Reserve Bank of India (RBI) clarified, "The company (Champcash or Champion Networks Pvt Ltd) is not registered with us - neither as an authorised entity under Payment and Settlement Act nor as an NBFC."
At the same time, we also sent some questions to Champcash, which are yet to be answered by the company. Here are the questions we asked...
- What is the churning ratio of Champcash users? On an average, how many users join and leave (uninstall) the app in a 12-months period? What is the user retention rate in this line of sponsorship?
- What is the average amount, a user typically earns in a month/year?
- How many users earn less than $100 as reference fee in a year?
- What is the maximum amount a user had earned in a year through referring Champcash app?
- What are the chances that someone who starts from scratch and earns a $1 million Champ Cash?
- Does the business module really free people from their jobs or have they just replaced their job with another that has more risk?
- Does the Champcash really allow the leaders more time with their families?
- Which are the apps that are referred for users by Champcash?
- What information is obtained by Champcash and the other installed apps from user's mobile phone?
- Kindly tell us names of advertisers, who are ready to pay $2 just for installing and using a third party app for a minute?
- How many advertisers are enrolled in Champcash programme?
- How many apps developers had partnered with Champcash programme?
- Who are the top executives at Champcash?
- Is there any specific reason, your domain Champcash.com is registered under proxy and all details like owner, contact info are kept hidden?
- Is Champion Networks Pvt Ltd registered with any regulator like the RBI, since it is involved in payouts? Also how much TDS is deducted on the payouts and deposited to the I-T Dept by Champcash?
Thursday, August 25, 2016
Adsense tricks for web intro
How to Increase your AdSense Income from Existing Traffic

Google AdSense is like the first teenage love in the life of a blogger. When a new blogger enters into this world of blogging, he often does so due to the potential of making money from blogging. Frequently, displaying ads on his blog using ad networks like Google AdSense comes at the top of a new blogger’s wish list, as it is the highest paying ad network on the planet.
Most new bloggers believe making money from AdSense is a simple process. A new blogger may think he simply needs to create a blog, drive traffic, and apply for AdSense, and he will be making money immediately. This is true to an extent, but there are a variety of tips one can employ in order to take full advantage of the money-making opportunities from Google AdSense.
AdSense works best when you have a quality traffic blog (target audience from U.S.), and you are using high CPC keywords on your blog.
Let’s consider two blogs:
Blog A and Blog B
Blog A is a successful blog which attracts millions of readers every month, and blog B is not as popular a blog, with only a few hundred visitors per month. Both bloggers are using AdSense to monetize their blogs.
In this scenario, blog A will make more money as it gets more traffic, and blog B will earn less. (For the sake of this example, we are ignoring some points like keywords CPC, and we are assuming both blogs are in the same niche).
If you own a blog like blog A with high traffic, then you may not need to study the information in this post. But if your blog is more like blog B, with comparatively minimal traffic, I would suggest that you pay close attention to the information in this post, as I am going to show you how you can increase your AdSense income from your existing traffic.
Working tips to increase AdSense earnings with little effort:
To ensure these tips will work for you, don’t simply read the following tips – take the time to employ them on your blog, as a little extra effort could help you to double or triple your total AdSense income.
Visibility factor

The visibility of your ads plays a major role in the number of clicks you are getting on your ads. The simple reason for this is, of course, if they don’t see the ad, they don’t click on it.
So the first thing you need to focus on is placing ads at highly visible positions, such as:
Focusing on ad placement is a very easy way to bring yourself more income. You can also try using services like Crazy Egg to check your readers’ focal points. Crazy Egg will create a heat map which shows the places where readers are looking and clicking the most. There is a fee for Crazy Egg, but if you don’t want to spend money on this type of service, you can try out clicktale, a similar service that is free for the first 100 page views. 100 page views may be enough to give you a sense of where you can best place your ads toward optimal performance.
Make your ads large and noticeable
A few days ago I was reading a report on engagement to content online. I read that updates with an image receive 39% more interactions than those without an image. The article I was reading related this statistic to Facebook, but this also holds true for advertising.
In the past few months AdSense has come up with the 300×600 ad unit and the 970×90 ad unit, because they understand that larger ads get more attention.
Let’s do an experiment: look at any two items – one large in size and the other small.
Make your ads larger, because people will be more likely to click on your ads when it is easy for them to be noticed.
Use the units
I have heard many bloggers say that we can only place three AdSense ad units on one page.
You read it right – eight ad units on a single web page.
Those eight ad units include three standard ad units, three link units, and two search forms.
In order to take full advantage of the money-making potential of Google AdSense, take the time to focus on this point, and fit all of the appropriate ads onto your blog and wait to see more money rolling into your AdSense account.
Another reason why this works is that additional ad units increase the variety of ads, and the increased variety of ads in turn increases the probability of a person clicking on one of your displayed AdSense ad units.
Remember to place the ad units in prominent places in an effort to make the ads work for you. Place them above the fold and around your content area. For example, you could place one AdSense search ad unit at the header, and another one after your content.
An example of poor placement of AdSense ads is at the footer area of your blog.
Color combinations
 Remember – one key to the success of your AdSense ads is grabbing the attention of your readers.
If you are using the standard text ad unit on your blog, remember that you have control of the color combinations.
Also, if you are going to place the text ad unit in between your content, try to merge it with your post text.
These factors will increase the chances of your readers looking at the ad and clicking on it, because you have made it more noticeable and differentiable. Adding a thin boundary outside the unit is also a good idea, because according to AdSense policies, the ads must be differentiable from the content.
And if you don’t want to merge the ad with your content, then make it different in order to make it stand out.
For instance, if the background of your blog is white, then try using black or any other bold color that stands out for your ad units.
Use DFP (Double Click for Publishers)
Google’s double click for publishers is a free ad server program which allows bloggers to sell ads on their blogs. If you need to make some money while using AdSense, you can sign up for DFP.
The way this works with AdSense is that you create an ad space on your DFP account and set it up for selling. It will take some time to attract advertisers, and of course you don’t want the ad space to remain vacant because then you won’t earn anything. So you can link your AdSense account with your DFP account, and as a result the spaces which are not yet used will be showing AdSense ads until someone buys those spaces.
This can help you to earn more, as Google’s ad filter only shows the highest paying adson a website. So if an advertiser is paying less for AdSense, but another advertiser is paying more on DFP, then the latter will be given preference and you will earn more.
Make your ads responsive
The responsive website interface is the trend nowadays as more and more people are browsing the internet through their phones and tablets. The problem is that if the screen width is less than the ad unit, the ad will not be shown. So if you have placed an ad unit of 728×90, this unit will not be shown on screens with a width less than 728px.
So to increase your ad revenue, you can try making your AdSense ads responsive. In theory this will allow you to earn more money, as the people who visit your blog through their mobile phones or tablets will also be able to see your ads. (At the time of the writing of this post, AdSense responsive ad unit is currently in beta, and is available for all AdSense publishers.)
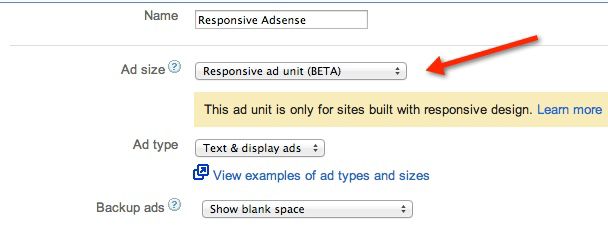
If you have a responsive blog layout, you should add responsive AdSense ad unit codes.
Rotate your ads and experiment:
Ad blindness is one of the most common reasons for low performing ads, and that is why we recommend that you use ad units above the fold, and rotate your ads. When we use the term “rotating”, we mean using a combination of text and image ads, and rotating them with affiliate ads and AdSense ads.
This is also the reason I recommend that you tweak your ad placement regularly. Whenever readers see anything new, they are more likely to notice and thus more likely to click.
You can also try merging the first few tips I noted above, and attract your reader’s attention toward your ads to get more clicks.
For WordPress blogs, we have the AdSense CTR theme which is perfect for a website which is constructed to make money from AdSense (for example, a micro niche site), or you can use AdRotate WordPress plugin to rotate your ads, and run different ads for every page view.
Last but certainly not least, make sure you deliver quality content to your readers. It is best not to focus so directly on generating more revenue, but to work on getting more traffic. At the end of the day, that traffic is what will bring you the revenue you seek.
If you find the information in this post useful, please share it with your friends and colleagues on Facebook, Twitter and Google Plus.
This is a guest post by Nishant from Inside Tech Tricks. If you would like to write for ShoutMeLoud, check our guest posting guidelines.
Monday, August 22, 2016
How to Switch from Blogger to WordPress without Losing Google Rankings
Blogger tricks
Blogger is an awesome free tool to quickly start blogging. However, many Blogger users eventually realize that if they want full control of their blog, then they would be better off with their own self hosted WordPress.org blog (what’s the difference between self-hosted WordPress.org vs WordPress.com blogs). In this step by step tutorial, we will help you switch from Blogger to WordPress without losing Google rankings.

Here are the steps you will be taking to switch from Blogger to WordPress without losing Google rankings.
- Sign up with WordPress hosting company.
- Export your Blogger blog by visiting Settings » Other page.
- Import Blogger to WordPress by visiting Tools » Import page in WordPress admin area.
- Setting up permalinks on your new WordPress blog.
- Setting up redirects for Blogger visitors to WordPress posts
- Set up redirects for RSS feeds
- Import your images from Blogger to WordPress media library.
Video Tutorial
If you don’t like the video or need more instructions, then continue reading.
Step 0. Before You Start
To get started with WordPress, the first thing you would need is a good WordPress hosting company and your own domain name. We highly recommend Bluehostbecause they will give you a free domain and 50% off their hosting plan (special for WPBeginner users). Bluehost is also an officially recommended hosting provider of WordPress.
If you want a Bluehost alternative, then take a look at Siteground who also offer the same special offer to WPBeginner users.
Once you have signed up for WordPress hosting and set up your domain name, the next step is to install WordPress on your hosting account. We have a step by step tutorial on how to install WordPress. Once you have installed WordPress, it is time to move your content from Blogger to WordPress.
Step 1. Export Your Blogger Blog
First thing you need to do is export your blogger blog’s content. Simply log into your blogger dashboard and go to Settings » Other page. Under the ‘Import & back up’ section, you need to ‘Back up Content’ button.

This will bring up a popup where you need to click on the ‘Save to your computer’ button.

Your Blogger blog’s content will be downloaded to your computer in an XML file.
Once the download is complete, it is time to import it into your WordPress site.
Step 2. Import Blogger to WordPress
To start importing your Blogger site into WordPress, you need to go to your WordPress admin and visit Tools » Import. On the Import page, click on Blogger.
This will bring up a popup asking you to install the Blogger to WordPress importer. You need to click on the Insall button.
WordPress will now download and install the Blogger Importer plugin for you. Once it is finished installing, you would need to click on the Activate Plugin and Run Importer link to continue.
On the Import Blogger screen, WordPress will ask you to upload the XML file. This is the file that you downloaded in Step 1.
Simply click on the choose file button and upload the XML file you downloaded earlier. Next, click on the Upload file and import button to continue.

Now if you didn’t select one of our recommended hosts or your site is really large, you may get an error that your file size is too large. In this case, you would need toincrease your maximum file upload limit. If your file is small, then you won’t see any errors.
WordPress will now import your blogger posts one by one. When it is finished, you will be asked to assign an author to the imported posts. You can assign your blogger posts to an existing author (you) or create a new author account.
Congratulations! you have successfully imported your Blogger content into WordPress. However, you still need to make sure that you don’t loose any search rankings and that visitors from your old blog easily land to the same content on your new WordPress website.
Step 3. Setting up Permalinks
Permalinks is the term used for URL structure of individual pages. WordPress comes with a feature that allows you to set up SEO friendly URL structure. However, since you are importing content from Blogger, you would want your URL structure to be as close to your Blogger URL structure as possible.
To set permalinks, you need to go to Settings » Permalinks screen and choose Month and Name as your permalink structure.
Step 4. Setting up Redirection
The most important step in moving any website is to set up proper redirection so that users are redirected to your new website.
The important part of redirection is that you want users to land on exactly the same page on the new site which they were trying to access on the old site. Secondly, this also notifies search engines that your old site is moved to a new location.
To successfully move from Blogger to WordPress, you need to set up redirection on two levels.
First, you will redirect Blogger visitors to your new WordPress blog. Second, once users reach your WordPress site, you will redirect them to the exact post they were trying to read.
Let’s first set up redirection on the blogger blog. You need to log on to your Blogger account and go to your Blog’s settings and click on Template.
On the template page, you need to scroll down to the bottom of the page and click on Revert to Classic Template link.
After switching to classic template, you will see ‘Edit Template HTML’ textarea. You need to replace everything in this text area with the following code. Make sure that you replace
http://www.example.com with your own domain name.01 | <html> |
02 | <head> |
03 | <title><$BlogPageTitle$></title> |
04 |
05 | <script> |
06 | <MainOrArchivePage> |
07 | window.location.href="http://example.com/" |
08 | </MainOrArchivePage> |
09 | <Blogger> |
10 | <ItemPage> |
11 | window.location.href="http://example.com/?blogger=<$BlogItemPermalinkURL$>" |
12 | </ItemPage> |
13 | </Blogger> |
14 | </script> |
15 |
16 | <MainPage> |
17 | <link rel="canonical" href="http://example.com/" /> |
18 | </MainPage> |
19 |
20 | <Blogger> |
21 | <ItemPage> |
22 | <link rel="canonical" href="http://example.com/?blogger=<$BlogItemPermalinkURL$>" /> |
23 | </ItemPage> |
24 | </Blogger> |
25 | </head> |
26 |
27 | <body> |
28 | <MainOrArchivePage> |
29 | <h1><a href="http://example.com/"><$BlogTitle$></a></h1> |
30 | </MainOrArchivePage> |
31 | <Blogger> |
32 | <ItemPage> |
33 | <h1><a href="http://example.com/?blogger=<$BlogItemPermalinkURL$>"><$BlogItemTitle$></a></h1> |
34 | <$BlogItemBody$> |
35 | </ItemPage> |
36 | </Blogger> |
37 | </body> |
38 | </html> |
Save your template, and you have successfully implemented redirection on your Blogger blog.
However, you still need to setup redirection on your WordPress site so that users are redirected to the proper posts.
You need to copy and paste the following code in your WordPress theme’sfunctions.php file or in a site-specific plugin.
If this is your first time adding code to your WordPress site, then you may want to check our beginner’s guide to pasting snippets from the web into WordPress.
01 | function blogger_query_vars_filter( $vars ) { |
02 | $vars[] = "blogger"; |
03 | return $vars; |
04 | } |
05 | |
06 | add_filter('query_vars', 'blogger_query_vars_filter'); |
07 | |
08 | function blogger_template_redirect() { |
09 | global $wp_query; |
10 | $blogger = $wp_query->query_vars['blogger']; |
11 | if ( isset ( $blogger ) ) { |
12 | wp_redirect( get_wordpress_url ( $blogger ) , 301 ); |
13 | exit; |
14 | } |
15 | } |
16 | |
17 | add_action( 'template_redirect', 'blogger_template_redirect' ); |
18 | |
19 | function get_wordpress_url($blogger) { |
20 | if ( preg_match('@^(?:https?://)?([^/]+)(.*)@i', $blogger,$url_parts) ) { |
21 | $query = new WP_Query ( |
22 | array ( "meta_key" => "blogger_permalink", "meta_value"=> $url_parts[2] ) ); |
23 | if ($query->have_posts()) { |
24 | $query->the_post(); |
25 | $url = get_permalink(); |
26 | } |
27 | wp_reset_postdata(); |
28 | } |
29 | return $url ? $url : home_url(); |
30 | } |
The code above creates a blogger to WordPress 301 redirect which is what you need to ensure best SEO.
Once you have pasted this code, that’s all you need to do for setting up redirection.
Now anyone visiting a post on your old Blogger blog will be redirected to the same post on your new WordPress site.
Step 5. Redirect Feeds
Your RSS subscribers on the old Blogger site will not be able to notice the switch. That’s why you will need to redirect your Blogger feed to your new WordPress site’s feed.
You can do this by logging in to your Blogger account and then visit Settings » Other page under your blog dashboard.
Under the Site Feed section, click on Add link next to Post Feed Redirect URL. Here you can enter your new WordPress site’s feed address.
Usually it is http://your-awesome-site.com/feed/ (don’t forget to replace your-awesome-site with your own domain name).
Step 6. Import Images From Blogger to WordPress Media Library
When you are transferring blogger to WordPress, the WordPress importer will download images from your blogger posts into the WordPress media library. However, it can fail to download some images. This doesn’t happen often, but it can happen.
But there’s nothing to worry about because you can find and import these images into WordPress. Follow the instructions in our how to import external images in WordPress tutorial.
This will import all images from your blogger into your WordPress Media Library. Once the images are in your WordPress media library, you can easily create image galleries and more.
We hope this tutorial helped you switch from Blogger to WordPress without losing Google rankings. We would like to welcome you to the WordPress community. To get started with WordPress, please take a look at our beginner’s guide section and our WordPress beginner videos.